Posts

Peer Review

Image
  Today, I showed my two-minute film project to my friend, Julie I was really nervous about it because I had put so much effort into it, and I really wanted her to like it, as well as get new advice on how to improve it before final submission. At first, Jane seemed really interested in the film. She was focused on it and didn't say anything for the entire two minutes. When the film was over, she took a deep breath and looked at me with a serious expression on her face. She started off by saying that she thought the film was really well made. She complimented the cinematography, the editing, and the sound design. She said that I had a good eye for visuals and that I had clearly put a lot of thought into every shot. However, she did have some constructive criticism for me. She said that she felt like the story was a bit weak and that she didn't really understand the point of the film. She suggested that I work on developing the characters more and giving them clearer motivations...
Back to CapCut!

Image
With my last few blogs, I had the task of reshooting all my unusable footage. This proved frustrating as I had already fully edited my short sequence. So, having to go back and reshoot, then take apart my project, THEN insert those clips back in, was difficult.  As I watched the horror short sequence that I had made for my class project, I realized that it needed a lot of work. The pacing was off, and the scares weren't as effective as I had hoped. I knew that I would have to re-edit the entire sequence if I wanted to improve it. It was frustrating to have to start over, but I was determined to make it better.  I began by rearranging the order of the shots to create a more cohesive story. Next, I focused on the sound design, adding in more atmospheric sound effects to heighten the tension. I also experimented with different music tracks to find the perfect score for the sequence. The music I used in the first half of the sequence sounded slightly corny. So I did more research ...

Re-re Shoots

Image
 As you may know from my previous blogs, I have been doing reshoots all throughout this production process. Before I even finished the script, I was eager to take some scenery and time-lapse shots to use in my opening sequence. But now that the final film has been shot, there are many things that need to be tweaked. And then there are some things that need to be completely redone. That is what this step in the process is for! Fixing the angle of my phone on a makeshift tripod was a challenging task. I had to make sure that the camera is level and not tilted to the side. It was also important to check if the camera is positioned at the right height and distance from the subject. Any sudden movement or bump can knock the camera out of alignment, so it was essential to ensure that the camera is secure and stable. Between shots I often accidentally adjust the camera a few units to the side, making the next shot off. Now, I ensured that I was extra careful when handing the phone in any ...

Onto Editing

Image
As I am working on the opening sequence for my horror short film project for class, I am currently in the process of editing shots on my iPhone. I must say, it has been a challenging but satisfying experience, and I am eager to share my journey with you. After shooting the footage, I spent time reviewing the shots and selecting the best ones that fit my vision for the opening sequence. I wanted to make sure that each shot was visually engaging and conveyed the mood and tone of the horror genre. To start the editing process, I used various editing apps on my iPhone to piece together the shots. My main used ones were CapCut and Inshot. InShot is more familiar to me, but CapCut is far more efficient as I have recently learned. I experimented with different transitions, filters, and sound effects to create a cohesive and engaging final product. I wanted the opening sequence to be gripping and to grab the audience's attention right from the start. So, I focused on starting with an unusu...

Finally Filming

Image
The day has come, it is now time to film. I have spent weeks planning and visualizing my opening sequence. But now, it is time to put pen to paper, or rather, words into live-action  The process has been both challenging and rewarding, and I am excited to share my experience. Before filming, I had to do the actor's makeup to ensure that he looked the part. I spent time researching and practicing different techniques to create a realistic and believable look. That was earlier though, and now I got to do it all myself. It turned out just how I had hoped, achieving the undead effect I was going for. It was a challenge, but I was happy with the final result. During filming, I had to be creative with the limited resources I had. I experimented with different angles and perspectives to create visual interest and used natural light to create a moody and atmospheric vibe. I also had to improvise and come up with solutions to problems as they arose. One was the ever-changing lighting. Once ...

Working the Camera

Image
 After preparing for costumes I feel the next step in production is working on the filming equipment. While my two previous media studies projects were also filmed on a phone, I feel for this next one I need to perfect this medium. This opening sequence will require a far more professional look, and it's time I adjust my filming process and make some changes. To start, I researched different techniques and tips for filming on an iPhone. I learned about lighting, angles, composition, and editing techniques that could help me create a professional-looking film. Next, I experimented with different camera apps to find the one that worked best for me. I also invested in some additional equipment, including a tripod and external microphone, to improve the quality of my footage. I spent time scouting locations and thinking about how I wanted to frame each shot. I experimented with different angles and perspectives to create visual interest and tell the story in a compelling way. During fi...

Prepping Costumes

Image
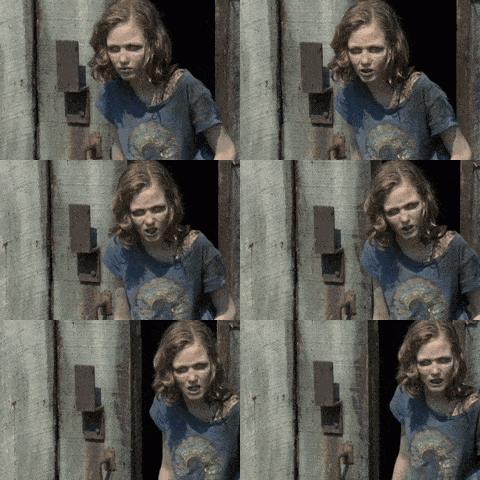
 Today was a more exciting day in the production process, as I got to researching and gathering materials for the costuming of my project. When it comes to costuming for my opening sequence, it will obviously all be very minimal. The main character will be wearing everyday clothing, and the only unique aspect of it will be the brother's makeup in the end.  This was a challenging task as I had to make sure the makeup looked realistic and scary enough to bring this undead character to life. To start, I researched different zombie makeup techniques and watched tutorials online to get some inspiration. The character will only be shown for a few shots in a dark setting. However, because this shot is the only one requiring makeup I feel it is immensely important I put some more effort into the look. I was especially inspired by this shot from the television show The Walking Dead. This character is almost identical to my character's physical circumstances, so it will make sense that...